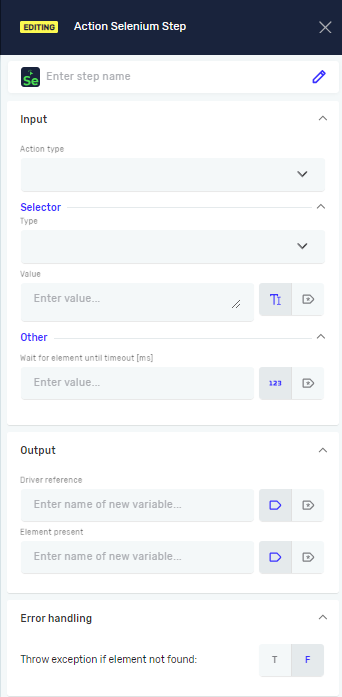
Action Selenium Step
The Action Selenium Step lets you interact with things on a web page. You can use it to move your mouse over an item or to move your mouse over it and then click it. This step helps you automate tasks in a web browser.
What You'll Need
- A Selenium driver that's set up.
- An open web browser.
How to Use the Action Selenium Step
Use this step to hover or hover and click on web elements.
Step 1: Add the Action Selenium Step
- Drag the Action Selenium Step into your process.
- Give the step a clear name in the Step Name field (this is optional).
Step 2: Set Up the Action
- In the Action Type menu, pick one of these:
- Hover: The robot moves the mouse over the web element you picked.
- Hover and Click: The robot moves the mouse over the element and then clicks it.
Step 3: Pick the Target Element
- In the Selector Type menu, choose how you want to find the web element. Your choices are:
- Class Name
- CSS Selector
- Name
- Id
- Link Text
- Partial Link Text
- Tag Name
- XPath
- In the Selector Value field, type in the value for the selector type you chose. This can be a variable or a direct value.
- Example: If you pick
Idas the selector type, type in the element's ID (likeloginButton).
- Example: If you pick
Step 4: Set How Long to Wait
- In the Wait for Element until timeout [ms] field, type the longest time (in milliseconds) the robot should wait for the element to show up. This can be a variable or a direct value.
Step 5: Choose Driver and Output
- In the Driver Reference field, give the variable that holds your Selenium driver.
- In the Element present field, pick a true/false variable. This variable will be
Trueif the element is found, orFalseif it isn't.
Parameters Explained
Step Name (Optional)
- A custom name for this step in your process.
- When to use it: To make your workflow easier to understand.
Action Type (Required)
- Says what the robot should do with the web element.
- Options:
Hover,Hover and Click - When to use it: To choose between just hovering or hovering and clicking.
Selector Type (Required)
- How you find the web element you want.
- Options:
Class Name,CSS Selector,Name,Id,Link Text,Partial Link Text,Tag Name,XPath - When to use it: To tell the robot how to find the specific element on the page.
Selector Value (Required)
- The actual value of the selector you picked.
- Example: If
Selector TypeisId, this would bemyElementId. - When to use it: To give the unique name for the element.
Wait for Element until timeout [ms] (Required)
- The most time (in milliseconds) to wait for the element to be ready.
- Example:
5000(waits for 5 seconds). - When to use it: To stop errors if things on the page load slowly.
Driver Reference (Required)
- The variable holding the active Selenium web driver.
- When to use it: To connect this step to your open browser.
Element present (Required)
- A true/false variable that shows if the element was found.
- When to use it: To check if the action worked or to handle problems.
Throw exception (Required)
- Decides if the process stops with an error if the element isn't found.
- Options:
T(True - stop with error),F(False - don't stop with error, this is the default) - When to use it: To control how your process reacts when elements are missing.
Related Articles
Need Help?
Can't find what you're looking for? Join the Robotiq Community to get help from other users and the Robotiq team.