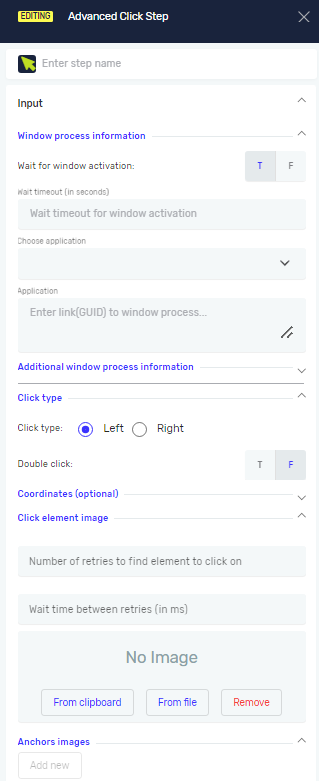
Advance Click Step
The Advance Click Step makes your mouse click on a specific spot in an application. You can use it to click buttons, links, or other things you see on screen in your automated tasks.
How to Use the Advance Click Step
Use this step to make a mouse click happen in an application.
Step 1: Add the Advance Click Step
- Open your process in the Robotiq.ai editor.
- Drag the Advance Click Step into your workflow.
Step 2: Set Up Step Information
- Step name (Optional): Give the step a name. This helps you find it in the editor.
Step 3: Set Up Application Settings
- Wait for window activation (Required):
- Pick
T(true) if the robot should wait for the window you want to click in to open. This is the default setting. - Pick
F(false) if the robot should not wait.
- Pick
- Wait timeout (in seconds) (Required): Type in how long the robot waits for the window to open.
- If "Wait for window activation" is
Tand you don't set a timeout, the robot waits forever or until the process stops.
- If "Wait for window activation" is
- Choose Application (Required): Pick the name of the application you set up earlier. You must have opened this application in your workflow already.
- Application (Required): This field automatically shows the application's name after you pick it.
- Choose existing class name (Optional): Give the specific name of a window element that already exists.
- Class name (Optional): Give the specific name of the application window element.
- Window title (Optional): Type in the text you see on the application window's control.
Important: The "Choose existing class name," "Class name," and "Window title" fields are hidden at first. Click to open them and type in your values.
Step 4: Set Up Click Settings
- Click type (Required):
Left(default): Clicks with the main mouse button.Right: Clicks with the secondary mouse button.
- Double Click (Required):
- Pick
T(true) to double-click. - Pick
F(false) for a single click. This is the default.
- Pick
- Use coordinates (if image not found) (Required):
- Pick
T(true) to use X, Y coordinates if the image isn't found. - Pick
F(false) to not use coordinates. This is the default.
- Pick
- X, Y coordinates (Optional): Type in the X and Y screen coordinates in pixels.
- If "Use coordinates" is
Tand you don't set coordinates, the robot clicks at (0,0).
- If "Use coordinates" is
- Number of retries to find element to click on (Optional): Type in how many times the robot should try to find and click the image.
- Wait time between retries (in ms) (Optional): Type in how long to wait in milliseconds between each try.
Step 5: Add the Image to Click
- Image (Required): Show the robot the picture of what you want to click.
- From Clipboard: Click this button to use an image you copied.
- From File: Click this button to pick an image file from your computer.
- Remove Image: Click this button to take away the image you picked.
Step 6: Add Anchors (Optional)
Anchors help the robot find the image better by showing it a specific area to look in.
- Anchors image (Optional):
- Click Add new to add an anchor.
- Choose image type (Required): Pick the kind of anchor.
Left anchorRight anchorTop anchorBottom anchor
- Image: Show the robot the picture for the anchor.
- From Clipboard: Use an image from your clipboard.
- From File: Pick an image file from your computer.
- Remove Image: Take away the anchor image you picked.
Important: You need to add a main image first before you can add anchors. You can add more than one anchor for a single image.
What the Parameters Mean
Step name (Optional)
- A name you give to the process step.
- Example:
Click Login Button
Wait for window activation (Required)
- Tells the robot if it should wait for the application window to open.
T(true) orF(false).Tis the default.
Wait timeout (in seconds) (Required)
- The longest the robot will wait for the window to open.
- Example:
30(seconds)
Choose Application (Required)
- The name of the application you want to use.
- Example:
MyBrowserApp
Application (Required)
- The system name of the application. This fills in by itself.
Choose existing class name (Optional)
- A unique name for a specific part of a window.
- Example:
ButtonClass
Class name (Optional)
- A unique name for the application window part.
- Example:
LoginButton
Window title (Optional)
- The text you see on the application window or control.
- Example:
Login Window
Click type (Required)
- Says which mouse button to use.
Left(default) orRight.
Double Click (Required)
- Makes a double-click if
T. T(true) orF(false).Fis the default.
Use coordinates (if image not found) (Required)
- If
T, the robot clicks at the X, Y coordinates you give if it can't find the image. T(true) orF(false).Fis the default.
X, Y coordinates (Optional)
- Screen coordinates (in pixels) for the click.
- Example:
X=100, Y=250
Number of retries to find element to click on (Optional)
- How many times the robot tries to find the image.
- Example:
5
Wait time between retries (in ms) (Optional)
- How long to wait between each try.
- Example:
500(milliseconds)
Image (Required)
- The picture of the thing you want to click.
Anchors image (Optional)
- Extra pictures that show an area around the main image to help find it better.
- Anchor types:
Left anchor,Right anchor,Top anchor,Bottom anchor.
Other Articles
Need Help?
Can't find what you're looking for? Join the Robotiq Community to get help from other users and the Robotiq team.