Find Image Step
The Find Image step looks for a specific image on your screen. You can use it to find visual parts inside an application window. This step helps when you need to click on something that doesn't have a unique name.
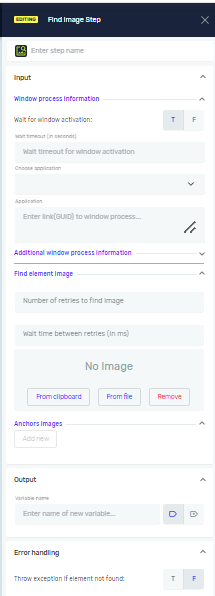
How to Use Find Image
Use this step to find an image on your screen. The robot will look for the image you set up and can then do things based on whether it finds the image.
Step 1: Add the Find Image Step
- Drag the Find Image step into your process workflow.
- Give the step a Step name (this is optional).
Step 2: Set Up Application Details
- Pick an option from the Choose Application menu.
- Select the application where the robot will look for the image. The Application field will fill in automatically.
- (Optional) Open the hidden fields to set a Choose existing class name, Class name, or Window title to narrow down the search.
Step 3: Pick the Image to Find
- In the Image section, click From Clipboard to use an image you've copied.
- Or, click From File to pick an image file from your computer.
- To remove an image you've picked, click Remove Image.
Step 4: Add Anchors (Optional)
Anchors help the robot find the image better by marking a specific area. You can only add anchors after you've added an image.
- Click Add new under Anchors image.
- Select the anchor image using From Clipboard or From File.
- Choose the Image type:
- Left anchor: Marks the left edge.
- Right anchor: Marks the right edge.
- Top anchor: Marks the top edge.
- Bottom anchor: Marks the bottom edge.
- You can add more than one anchor to mark a precise search area.
Step 5: Set Up Output and Error Handling
- Type a Variable name for the output. This variable will be True if the image is found, False if not.
- Set Throw exception if image not found to
T(True) if you want the process to stop with an error when the image isn't found. Set it toF(False) to keep the process going. - Set Throw exception to
T(True) if you want the process to stop on any error in this step. Set it toF(False) to keep going.
Parameters Explained
Step name (Optional)
- A custom name for this step in your process.
Wait for window activation (Required)
T(True): The robot waits for the right window to open before looking for the image. This is the default setting.F(False): The robot does not wait for the window to open.- When to use it: Set to
Tif the window might not be open when the step runs.
Wait timeout (in seconds) (Required)
- The longest time (in seconds) the robot will wait for the window to open.
- When to use it: Use this when
Wait for window activationis set toT. If you don't set a timeout, the robot waits forever or until you stop the process.
Choose Application (Required)
- The name of the application where the robot will search.
- When to use it: Pick the application that was already opened, for example, using the Open Window Process Step.
Application (Required)
- The name of the chosen application. This field fills in automatically.
Choose existing class name (Optional)
- A unique name for a window part inside the application.
- When to use it: Use this to target a specific part of a complex application.
Class name (Optional)
- The unique name of a window part inside the application.
- When to use it: Use this to target a specific part of a complex application.
Window title (Optional)
- The title you see on the application window.
- When to use it: Use this to find a specific window by its title.
Number of retries to find element to click on (Optional)
- How many times the robot will try to find the image.
- When to use it: Increase this if the image might not show up right away or if the application is slow.
Wait time between retries (in ms) (Optional)
- The delay (in milliseconds) between each try.
- When to use it: Use this with
Number of retries. A longer wait can help with things that load slowly.
Image (Required)
- The image the robot will look for on the screen.
- When to use it: You must set at least one image.
Anchors image (Optional)
- Extra images that mark an area around the main image.
- When to use it: Use anchors to make image detection more accurate, especially in busy screens.
Choose image type (Required, when using anchors)
- Sets where the anchor is compared to the main image. Options are Left, Right, Top, and Bottom anchor.
- When to use it: Pick the type that best describes the anchor's spot.
Variable name (Required)
- The name of the True/False variable that holds the result of the image search.
- When to use it: Use this variable later to check if the image was found.
Throw exception if image not found (Required)
T(True): The process stops if the image isn't found.F(False): The process keeps going even if the image isn't found. This is the default.- When to use it: Set to
Tif finding the image is a must for the process to continue.
Throw exception (Required)
T(True): The process stops if any error happens in this step.F(False): The process keeps going even if an error happens. This is the default.- When to use it: Set to
Tfor important steps where any error should stop the process. See Error Handling for more details.
Related Articles
Need Help?
Can't find what you're looking for? Join the Robotiq Community to get help from other users and the Robotiq team.