Add New Element To List Step
The "Add New Element To List" step lets you put an item into a list you already have. You can add text or numbers to lists, as long as they're the same type. This step helps you build or change lists in your automated tasks.
How to Use the Add New Element To List Step
Use this step to add a value to a list.
Step 1: Add the Step to Your Process
- Drag and drop the "Add New Element To List" step into your workflow.
- (Optional) In the "Step Name" field, give the step a custom name.
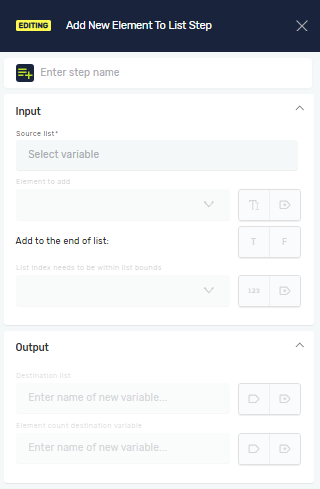
Step 2: Configure Input Parameters
- Source list: Pick an existing list. This is the list you want to add something to.
- The list can hold either numbers or text.
- Element to add: Type in the value or pick a variable you want to add to the list.
- This item's type (text or number) must match the "Source list" type.
- Add to the end of list: Flip this switch.
- Set to True (this is the default) to add the item to the end of the list.
- Set to False to add the item at a specific spot. If you pick False, you'll need to fill in the "List index" field.
- List index: (You need this if "Add to the end of list" is False) Type in the position where you want to add the item.
- The first item in the list is at index 0.
Important: The "Element to add" and "Destination list variable" fields are grayed out until you pick a "Source list." This is because their data types depend on the source list.
Step 3: Configure Output Parameters
- Destination list variable: Pick an existing list or make a new one. This variable will hold the updated list.
- This list's data type must match the "Source list" type.
- Element count: Pick an existing number variable or make a new one. This variable will hold the total number of items in the updated list.
Parameters Explained
Step Name (Optional)
- A custom name for the step.
- Example:
Add Customer ID to List
Source list (Required)
- The name of an existing list (numbers or text).
- Example:
myCustomerIDs
Element to add (Required)
- The value or variable to put into the list.
- Example:
newID(variable) or12345(value)
Add to the end of list (Required)
- A switch.
- True (default): Puts the item at the end.
- False: Puts the item at a specific spot.
List index (Optional)
- The spot in the list where the item will go. You only need this if "Add to the end of list" is False.
- Example:
0(to add at the beginning)
Destination list variable (Required)
- The variable that will hold the list after the new item is added.
- Example:
updatedCustomerIDs
Element count (Required)
- A number variable that will hold the total number of items in the updated list.
- Example:
customerCount
Common Issues
Problem: You can't pick an "Element to add" or "Destination list variable." Solution: First, pick a "Source list." These fields will become active once the system knows what kind of data your list holds.
Problem: You want to change a list's data type (for example, from a list of text to a list of numbers). Solution: You need to clear the existing list first. Then, you can pick a new data type. Remember that clearing the list will delete everything in it.
Related Articles
Need Help?
Can't find what you're looking for? Join the Robotiq Community to get help from other users and the Robotiq team.