Key Input Step
The Key Input step makes an open application act like someone typed a single key. You can use it to send specific key presses, like "Enter" or "Tab," to an application.
How to Use the Key Input Step
Add the Key Input step to your process to send a single key press to an application.
Step 1: Add the Key Input Step
- Drag and drop the Key Input step into your process.
- (Optional) Give the step a Step name to label it in the editor.
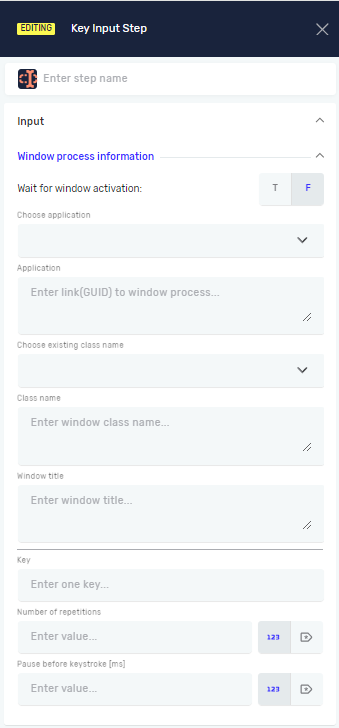
Step 2: Configure Application Details
- Select Choose Application.
- Pick the application instance you want to send the key to from the dropdown.
- The Application field will fill in with the application instance name automatically.
- (Optional) Type a Class name if you need to target a specific part of the window in the application.
- (Optional) Type a Window title if you need to target a specific window by its visible title.
Step 3: Define the Key Press
- In the Key field, type the single key you want to simulate pressing. For example, "Enter" or "Tab".
Step 4: Configure Repetitions and Pause
- (Optional) Type a Number of repetitions if you want to press the key more than once.
- (Optional) Type a value in Pause between keystrokes [ms] to add a delay between repeated key presses. This value is in milliseconds.
Parameters Explained
Step name (Optional)
- A custom name for the step. This helps you find the step in the Process Editor.
Wait for window activation (Required)
- This setting controls if the step waits for the application window to be active before running.
- T (True): The step waits for the application window to become active.
- F (False): The step runs right away. This is the default setting.
Choose Application (Required)
- The custom name of the application instance or process you opened earlier in your workflow.
- Example: If you used an Open Window Process Step to open "Notepad," you would pick "Notepad" here.
Application (Required)
- The internal name of the application instance. This field fills in automatically after you choose an application.
Choose existing class name (Optional)
- Pick an existing unique name for a window element inside the application instance.
Class name (Optional)
- The unique name of a specific window element inside the application instance.
Window title (Optional)
- The visible title of the application window you want to target.
Key (Required)
- The single key you want to simulate pressing.
- Example: "Enter", "Tab", "Space", "A"
Number of repetitions (Optional)
- How many times the key should be pressed.
- Example: Type "3" to press the key three times.
Pause between keystrokes [ms] (Optional)
- The delay in milliseconds between each key press if you set a number of repetitions.
- Example: Type "100" for a 100-millisecond pause between each key press.
Related Articles
Need Help?
Can't find what you're looking for? Join the Robotiq Community to get help from other users and the Robotiq team.