Click and Type Step
The Click and Type step makes the mouse click on a specific image and then types text there. Use this step to work with applications by clicking buttons, fields, or other visuals and typing in data.
How to Use the Click and Type Step
Step 1: Add the Click and Type Step
- Open your process in the Robotiq.ai editor.
- Drag the "Click and Type" step into your workflow.
Step 2: Set Up Application Details
- Choose Application: Pick the application you want to use. This application needs to be open already.
- Application: This field fills itself in based on what you picked for "Choose Application."
Step 3: Set Up the Click Action
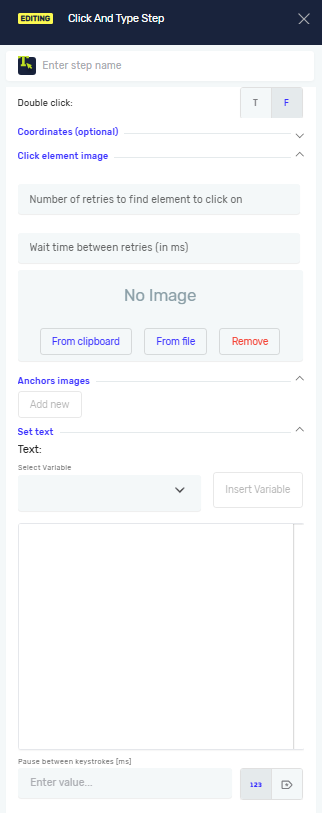
- Image: Add a picture of the thing you want to click.
- Click From Clipboard to use an image you've copied.
- Click From File to pick an image file from your computer.
- Click Remove Image to delete the current image.
- Click type: Choose how the robot clicks.
- Left (default): This is a normal mouse click.
- Right: This is a right-click.
- Double Click: Set this to True if you need to double-click. It's False by default.
Step 4: Add Anchors (Optional)
Anchors help the robot find the image better, especially if the target might move a little.
- After adding your main image, click Add new under "Anchors image."
- Pick the Choose image type (Left, Right, Top, Bottom).
- Add an image for the anchor:
- Click From Clipboard to use an image you've copied.
- Click From File to pick an image file from your computer.
- Click Remove Image to delete the current image. You can add more than one anchor.
Step 5: Say What Text to Type
- Text: Type in what you want the robot to type after clicking.
Parameters Explained
Step name (Optional)
- A custom name for this step in your process.
Wait for window activation (Required)
- True (default): The robot waits for the application window to open before it does anything else.
- False: The robot doesn't wait for the window to open.
Wait timeout (in seconds) (Required)
- The longest the robot will wait (in seconds) for the window to open if "Wait for window activation" is True. If you don't set a timeout, the robot waits forever or until you stop the process.
Choose existing class name (Optional)
- The specific name of an existing application window element.
Class name (Optional)
- The specific name of an application window element.
Window title (Optional)
- The title you see on the application window.
Use coordinates (if image not found) (Required)
- True: If the robot can't find the image, it will click at the X, Y coordinates you give it instead.
- False (default): The robot won't use coordinates if it can't find the image.
X, Y coordinates (Optional)
- The X and Y screen coordinates (in pixels) for the click. If "Use coordinates" is True and you don't change these values, the robot clicks at (0,0).
Number of retries to find element to click on (Optional)
- How many times the robot tries to find and click the image.
Wait time between retries (in ms) (Optional)
- The delay (in milliseconds) between each time the robot tries again.
Pause between keystrokes [ms] (Optional)
- The delay (in milliseconds) between each character the robot types.
Related Articles
Need Help?
Can't find what you're looking for? Join the Robotiq Community to get help from other users and the Robotiq team.