Add Row In Data Table Step
The "Add Row In Data Table" step puts a new row of information into a data table you already have. You can put the row at the end of the table or pick a specific spot for it. This helps you handle table data as your automation runs.
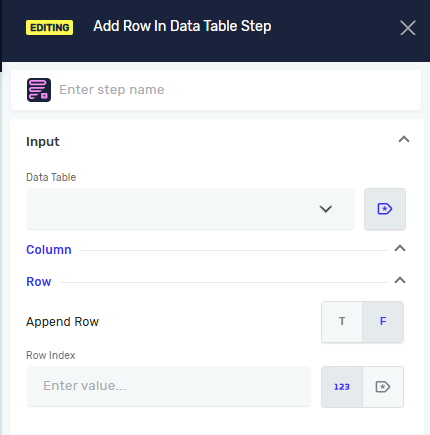
How to Use Add Row In Data Table
Use this step to put new information into a data table variable in your automation.
Step 1: Set up the Data Table
- Drag the "Add Row In Data Table" step into your workflow.
- In the Data Table field, pick the data table variable where you want to add the new row.
Step 2: Set Columns and Row Values
- In the Column field, name the columns where you want to put values.
- In the Row field, type in the values for the new row. These values need to be in the same order as the columns you named.
Step 3: Pick Where the Row Goes
- For the Append Row setting:
- Set it to
T(true) to put the new row at the end of the table. This is what it does by default. - Set it to
F(false) to put the new row in a specific spot.
- Set it to
- If you set Append Row to
F, use the Row Index field to say exactly where (the index) the new row should go.
Important: Row indexes start at 0. For example, an index of 0 puts the row at the very beginning of the table.
Parameters Explained
Step name (Optional)
- A name you choose for this step in your process.
Data Table (Required)
- The data table variable that will get the new row.
Column (Required)
- The names of the columns where you will put values.
- Example:
["Name", "Age", "City"]
Row (Required)
- The values for the new row, matching the columns you picked.
- Example:
["John Doe", "30", "New York"]
Append Row (Required)
- Controls where the new row goes.
T(true): Puts the row at the end of the table. (Default)F(false): Lets you pick an index for where to put it.
Row Index (Optional)
- The zero-based number for where the new row will go.
- You only need this setting if Append Row is set to
F. - Example:
0(puts it at the start),1(puts it after the first row).
Related Articles
- Create New Data Table Step
- Delete Row In Data Table Step
- Update Value In Data Table Step
- Add Column In Data Table Step
Need Help?
Can't find what you're looking for? Join the Robotiq Community to get help from other users and the Robotiq team.