Convert Csv To Excel Step
The Convert CSV to Excel step changes a CSV file into an Excel (.xlsx) file. You can set custom delimiters, manage header rows, and name the Excel file and sheet. This step helps you move structured data from CSV to Excel for reports or analysis.
How to Convert CSV to Excel
Step 1: Add the Convert CSV to Excel Step
- Open your workflow in Robotiq.ai.
- Drag and drop the Convert CSV to Excel step into your process.
Step 2: Configure Input Parameters
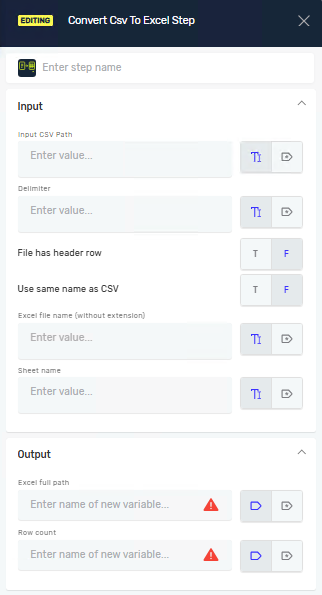
Input CSV Path (Required)
- Enter the full path to your source CSV file.
- Example:
C:\Data\my_data.csv
Delimiter (Required)
- Pick the character that separates columns in your CSV file.
- Example:
- Comma:
, - Semicolon:
; - Tab:
\t
- Comma:
File has header row (Required)
- Choose if the first row of your CSV file contains column headers.
- True (T): The first row becomes column headers in Excel.
- False (F): (Default) Columns will be named automatically (e.g., Column1, Column2).
Use same name as CSV (Required)
- Decide if the Excel file should have the same name as the CSV file.
- True (T): The Excel file uses the CSV file's name. The Excel file name field turns off.
- False (F): (Default) You can enter a custom name for the Excel file.
Excel file name (Required)
- Enter the name for your new Excel file (without the
.xlsxextension). - This field is required if Use same name as CSV is set to
False. - Example:
MyConvertedReport
Sheet name (Required)
- Enter the name for the sheet within the Excel file where your data will be stored.
- Example:
ReportData
Step 3: Configure Output Parameters
Excel full path (Required)
- Enter the name of a variable to store the full path of the generated Excel file.
- This variable will hold the location of your new Excel file.
Row count (Optional)
- Enter the name of a variable to store the total number of rows written to the Excel file.
Related Articles
- Open Excel File Step and Close Excel File Step
- Save Data Table To Excel File Step
- Excel To Data Table Step
Need Help?
Can't find what you're looking for? Join the Robotiq Community to get help from other users and the Robotiq team.