
Jobs GraphQL API
The Job API allows you to retrieve job execution information using GraphQL. This enables you to build custom reports and integrations using flexible queries that return only the data you need.
How it Works
GraphQL uses a single endpoint where you define exactly which fields you want returned. This means you can request only the data you need, reducing response size and improving performance.
Step 1: Build Your Request
- Open Postman and create a new GraphQL request
URL: https://api.robotiq.ai/{tenantName}/job/graph
- Authorization:
Bearer Token
- Query:
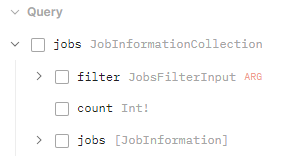
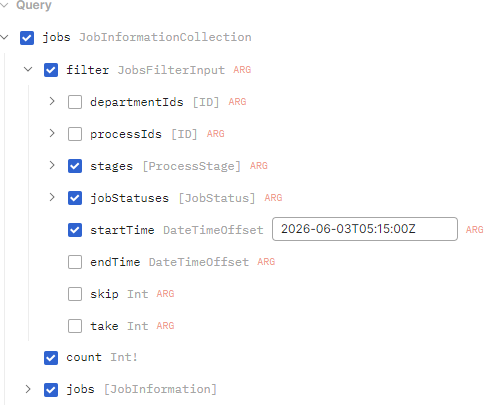
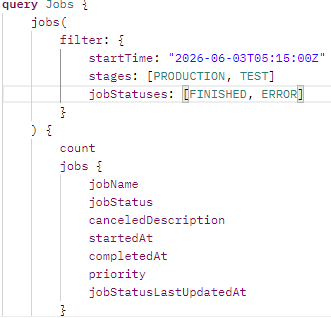
In the query tab you can select you can use the checkboxes to select which fields you want to include in your query - Postman will automatically build the query for you based on your selection
filter: expand this to select which filters you want to apply
count: returns the total number of jobs matching your filters
jobs: expand this to select which job fields you want returned in the response
Note: List arguments are not currently supported so you should manually write them in the generated query in Query editor.
Example:
Step 2: Understand the Filters
You can filter jobs using the following fields:
| Field | Type | Description |
| departmentIds | array of GUIDs | Filter by one or more department IDs |
| processIds | array of GUIDs | Filter by one or more process IDs (this is the version specific identifier, not the top-level process identifier) |
| stages | array of process stages | Filter by execution stages |
| jobStatuses | array of Job statuses | Filter by job statuses |
| startTime | DateTimeOffset | Return jobs that started at or after this time (UTC) |
| endTime | DateTimeOffset | Return jobs that ended at or before this time (UTC) |
| skip | integer | Number of jobs to skip before returning results (Default: 0) |
| take | integer | Number of jobs to return (Default: 100, Maximum: 500) |
*To retrieve a specific range of results, use skip to define where to start and take to define how many jobs to return - for example, to get jobs 15 to 30, set skip to 14 and take to 16
Step 3: Validation Rules
Stages validation
Supported values:
DEVELOPMENT, TEST, PRODUCTION
*must be in uppercase
jobStatuses
Supported values:
CREATED, QUEUED, RUNNING, FINISHED, CANCELED, ERROR, ABORTED
*must be in uppercase
Date Range Validation
- EndTime must be greater than or equal to StartTime
- startTime and endTime must be provided in date and time with timezone offset format, for example "2026-05-01T00:00:00Z"
Step 4: Understanding the Response
A successful request returns a JSON object containing job execution data. Each job in the response represents a single job run, including its status, timing and robot information.
Response structure
| Field | Description |
| count | Total number of jobs matching your filters |
| jobs | List of job details |
Job Fields
| Field | Description |
| processName | Name of the process that was executed |
| processId | Name of the process that was executed |
| departmentName | Name of the department the process belongs to |
| departmentId | Unique identifier of the department |
| jobName | Name of the job |
| jobStatus | Current status of the job |
| canceledDescription | Reason for cancellation, if the job was cancelled |
| startedAt | When the job started executing (UTC) |
| completedAt | When the job finished executing (UTC) |
| priority | Priority level assigned to the job |
| timeout | Job timeout in minutes |
| scheduleId | Identifier of the schedule that triggered the job |
| retryAttempts | Number of retry attempts configured for the job |
| jobExecutionTimeout | Maximum allowed execution time for the job |
| robotName | Name of the robot that executed the job |
| robotId | Unique identifier of the robot |
| jobInputArguments | Input arguments passed to the job at execution time |
| jobOutputArguments | Output arguments returned by the job after execution |
| errorDetails | Error information if the job failed |
| jobStatusLastUpdatedAt | Timestamp of the most recent job status update (UTC) |
Need Help?
Can't find what you're looking for? Join the Robotiq Community to get help from other users and the Robotiq team.