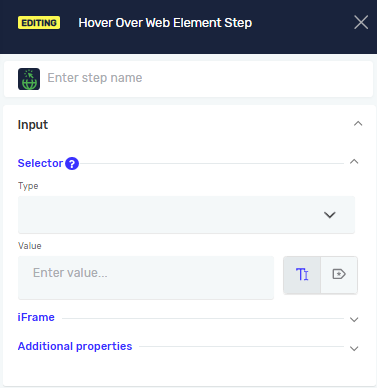
Hover Over Web Element Step
The Hover Over Web Element step moves the mouse pointer over a specified web element on the active browser page. Use this step when you need to trigger hover actions, reveal hidden elements, display tooltips, or interact with web components that respond to mouse movement.
How to Use the Hover Over Web Element Step
Step 1: Add the Hover Over Web Element Step
- Drag the Hover Over Web Element step into your process workflow.
- Give the step a clear name in the Step Name field. This helps you find it later.
Step 2: Tell it What to Hover Over
- Pick a Selector Type from the dropdown menu. This tells Robotiq.ai how to find the web element.
- Type in the Selector Value. This is the specific identifier for the element, based on the type you picked.
Important: You can find these selector values by looking at the elements in your web browser's developer tools.
Step 3: Pick Driver and Timeout
- Enter the Driver Reference. This is the variable that holds your web browser.
- Set the Wait for Element until timeout [ms]. This is how long (in milliseconds) the step will wait for the element to show up before it gives up.
Parameters Explained
Step Name (Optional)
- A custom name for the step.
- Example:
Hover User Menu - Use this to make your steps easy to understand.
Selector Type (Required)
- How Robotiq.ai finds the web element.
- Options:
Class Name,CSS Selector,Name,Id,Link Text,Partial Link Text,Tag Name,XPath - Pick the type that best identifies what you want to click.
Selector Value (Required)
- The specific value for the selector type you chose.
- Example: If
Selector TypeisId,Selector Valuemight bemainMenu. - You can use an existing variable name or type in a direct value.
IFrame Selector Type (Optional)
- Defines how the iframe containing the target web element is identified.
- Options:
Class Name,CSS Selector,Name,Id,Link Text,Partial Link Text,Tag Name,XPath - Select the option that best identifies the iframe you want to interact with.
IFrame Selector Value (Optional)
- Specifies the value used to locate the iframe based on the selected IFrame Selector Type.
- Example: If IFrame Selector Type is
Id, the IFrame Selector Value could bepaymentIframe. - Use this when the element you want to interact with is located inside an iframe.
Driver Reference (Required)
- The variable that holds the web browser.
- Example:
myBrowserDriver - This links the click to a specific open browser.
Wait for Element until timeout [ms] (Required)
- The most time (in milliseconds) to wait for the element to load.
- Example:
5000(waits for 5 seconds) - Set a reasonable timeout so your processes don't fail too quickly.
Addditional Selectors (Optional)
- List of selectors, allowing you to define multiple selectors for the same step
- If the primary selector fails and additional selectors are defined, the step will automatically try the additional selectors in order.
- You can add, remove, and reorder selectors at any time.
- Any selector can be promoted to the primary selector, which will swap its position with the current primary selector.
- Each selector is evaluated for the duration of the timeout defined on the step before moving on to the next one.
- If you want to promote a selector to be the primary selector, first provide all required details (selector type and value), then click the swap icon next to selector type.
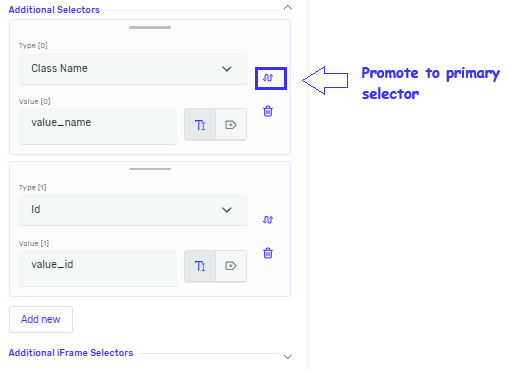
The log indicates which selector was successfully resolved. If a secondary selector from the selector list is consistently matched, you may consider setting it as the primary selector.
Related Articles
- Record process - Find out how to record your browser actions to create steps automatically.
- Browser Group - Find out how to use the Browser Group.
Need Help?
Can't find what you're looking for? Join the Robotiq Community to get help from other users and the Robotiq team.